Tag Archives: Loose parts

Summer 2023

Wow! So much to write, so little time. Sad that I haven’t been writing any posts about our activities or any of our new ‘stuff’. Yes, the grant funding we’ve received through the Federal funding for childcare has been wonderful but also very time consuming. Spending money is easy but trying to balance ‘wants’ vs ‘needs’ and make the best decisions so I won’t be faced with ‘I wish we had bought that instead’ after all the money is spent – that is hard.

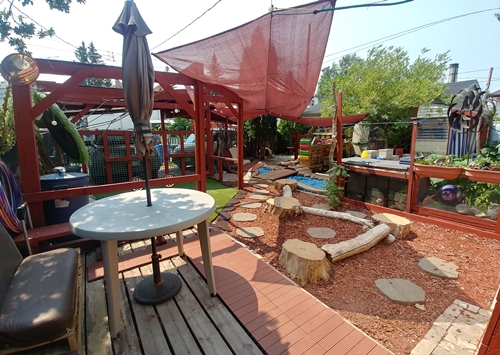
In the Spring when the grant funding was first announced I was already in the midst of making my summer ‘vacation’ plans for revamping the outdoor play space so those plans got a little more upscaled. I knew we had to remove the old rotted wooden pergola but we used that pergola to attach the sun shades for the summer. My south facing outdoor play space can be unbearable without shade – so my first purchase was two retractable awnings.

The old sunshades provided wonderful shade over most of the back yard but it took a whole weekend to get them up using clamps and ropes attached to the house, carport, and pergola. Once they were up, we had no view of the sky until fall when we took them down. On many cloudy or cool days we would have preferred to not have the sunshades but it was far too difficult to take them down temporarily.

This is a view of the yard after all the work we did on my ‘vacation’. You can see the framework for the new awnings but the awnings are not in use as this pic was taken in the early morning when there was little sun. I still struggle with deciding if I should say the awnings are ‘open’ when they are folded and we can see the sky and closed when they are unfolded and covering the yard or vice versa. Either way, all summer we loved to have the option of having sun or shade depending on the weather when we were playing in the yard.

Outdoor Play Space

I also purchased more turf tiles – we used to only have a small ‘grass’ area inside the old pergola but now it is twice the size and more open without the pergola dividing the space. We also have a new ground level deck area along the fence side that we use for the easels and other art activities (the deck tiles are easy to clean and have no spaces big enough to lose crayons and paint brushes etc.

Outdoor Play Space

The turf tiles are thick rubber and placed on the mulch – both help cushion minor falls which is nice for the climbing structures and the new Ninja Slackline pictured below (also notice the awning is providing shade in this pic).

Play Space with Ninja Slackline

This summer we finally installed the large laundry sink (on the to do list last year). It is not a new sink, just a new location, and we have always had access to both hot and cold water here but now it is much more convenient to use.

Wooden Storage Shed and counter with sink and hoses.

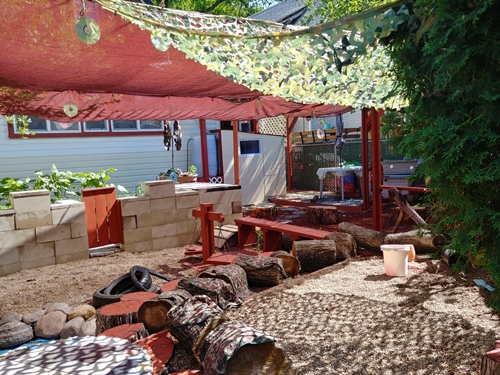
Moving along to the other side of the yard, we have a new, slightly sloped bridge across the ‘river’ in the water area and two new blue tunnels. The children like to pretend they are swimming under water when they crawl through these tunnels – I want to paint some fish inside the tunnels but haven’t done that yet.

Wooden bridge over blue tarp river.

The bilge pump and water supply has a new location now too though I actually have plans to modify this area more before next summer so this is only temporary. The water from the pump flows under the bridge and down the ‘river’. The sprinkler hangs from the awning frame above the water area so we can make it ‘rain’ when we want the water area really wet (there are holes in the tarps so water does not pool).

water barrel and pump with hose.

At the far end of the bridge is the gravel digging area – we needed the bridge higher here because the gravel area is more than a foot higher than the ground at this point. Plus, having a sloped bridge is extra fun 🙂 I chose to move all the gravel into the little covered ‘house’ we built last summer. The ‘house’ is in the corner of the yard which helps to keep the gravel contained in the area where it belongs and the roof above provides shade at all times of the day – particularly nice because some children like to sit and dig in the gravel for hours every day and I don’t want them to bake in the sun.

Enclosed gravel area with pots, pails, shovels, and sticks for digging.

The picture below is the view from inside the gravel area.

View through the trees towards the bridge and play area beyond.

I moved the talking tube (central vac pipe) from the building area where it used to be. Now it runs along the fence from the gravel area to the water area. I also added some elbows to the pipe so the children don’t look straight through the pipe when they are talking. Not that I minded them using it like a telescope, but some of them couldn’t grasp the concept of ‘talking’ into the tube when they could see through it and would get very frustrated that it didn’t work.

Ten foot long white pipe attached to chain link fence.

In the space where the gravel used to be is our new ‘music’ area. It is still not complete. In this picture there is nothing ‘new’, we have had the chimes, drums, and other noisy things for many years but now they are all together in a defined space. There are more turf tiles and our old stumps here for seating options. There are multiple different surfaces and items that can be used for experimenting with sound. Since this photo was taken I have purchased some Boomwackers and am collecting some additional ‘music’ making items to add in the future. (Donations are welcome if you have anything that may be useful here).

Outdoor area with chimes and drums.

View of the entrance to the music area – the Virginia Creeper has grown a lot and now covers most of the back and left side of the area – naturally containing the sounds in an acoustic chamber.

The building/construction area of the yard has not been moved or rearranged but I did purchase a large resin storage shed to store the massive amount of loose parts we have accumulated. We have far too much to have all of it out at once and our little toy shed only holds small bins and could not possibly contain all our building supplies.

Outdoor Play area with Loose Parts for constructive activities.

A tiny peek inside the shed – this is less than a quarter of what is being stored here. Kept out of the elements but still handy when we want additional options beyond what is available in the loose parts bins.

Various types of stacked wood pieces.

Summer Recap part 2

In my last post I covered some of the changes I had made to our outdoor play area. I mentioned that I had built a new roof over the little house in the corner of the yard and that moving the bus benches here made this a favourite sit spot all summer. However, I did not have a picture to include in my last post – but I do now;

I also promised to write more about some of our summer activities so that is what this post is for. Although International Mud Day occurs before my summer vacation, I never write about it until after. I didn’t write a dedicated ‘Mud Day 2022’ post but I can’t have a summer activities post without at least a couple mud day photos. This particular group was highly motivated to wash muddy toys so much of the activity was ‘mud on, mud off, repeat’.

Children playing in pool of mud
Children playing in mud and washing toys

The building area of the yard was popular all summer – surprisingly more popular than the water area or the climbing wall. Often, we had all eight of the children wanting to play here at the same time though they still preferred to create separate small ‘homes’ in a ‘town’ rather than work together on a single, large structure like other groups have in the past.

Children building structures with loose parts

The gravel/digging area, of course, was always popular though usually only for smaller groups at one time. It was interesting to note that, no matter what the activity was, these two were always choosing to play together. The oldest and the youngest in the group – nine years difference in age – but they played so well together all summer. Observing friendships like this is one of the things I like best about having a mixed age group.

Children pouring gravel in a tube

We also started a collection of ‘nature stuff’ to use to make mandalas. Some of the children only liked the ‘collecting’ part, others preferred simply sorting the items that were collected on our walks. Only a few actually seemed to enjoy creating the mandalas though.

Children creating mandalas with items from nature

As usual, we went to parks almost every day to play tag or other group activities that require a big open space that we can’t do in my yard. I almost never take the children to playstructures but we do love the climbers they have at St John’s Park.

Children climbing poles
Child climbing rock
children on monkeybars

Whenever the basketball court was empty, the children always wanted to play line tag.

Children running on outdoor basketball court

Some of the children tried cutting tree cookies. Even though we only used small branches this was a surprisingly difficult/time consuming activity. The children who were persistent enough to cut all the way through were very proud of their achievement – so was I 🙂

Preschool child using hand saw to cut branch

Fantastic Summer!

Vacation 2021

I didn’t take vacation time in 2020 so this year I was really looking forward to the time off to complete some much needed projects. I had a total of 19 days this year and five projects planned. Only one of the projects was an indoor project – replace foam tiles on playroom floor. It had originally been on my list for 2020 but then – no vacation, no reno.

I have replaced the interlocking foam tiles many, many times as a weekend project because removing old worn tiles and installing new ones isn’t very difficult. However, this time it was going to take longer as I was NOT planning on adding more foam tiles because Montgomery eats them and I don’t need more vet bills.

This time I went with much more durable rubber gym flooring. Like the foam, it provides traction and sound dampening over the hardwood floor and is so much nicer for sitting or crawling on.

My second project was not a play space but it improved access. The front sidewalk was just off centre of the front yard – two fence panels on the West side of the walkway and one fence panel on the East. There were stepping stones from the sidewalk to the front steps and side gate both located on the East side of the yard.

Now all three fence panels are together and the sidewalk is located on the East side of the yard and leads directly to the front steps and back yard gate. Bonus result is I could also expand the native prairie garden into the space where the sidewalk had been. The opportunity to add garden space means this project was more ‘relaxing’ than actual work even though the temps were about 30C every day! Oh, and we also added a garden bench because we had some extra wood! Only needed to buy a little soil and mulch, otherwise everything for this project was recycled/reused so total cost under $100 🙂

The remaining three mini projects were all part of the full back yard renovation. The main purpose of which was to define the spaces better and improve storage for all the loose parts.

The picture below is from 2019 and shows the deep gravel ‘digging’ area on the right surrounded by stumps and the lower ‘building’ area on the left. I tried to keep the gravel in the building area level and packed – better for building on – but the children tended to dig here too, after all it was gravel.

The full back yard now looks like this (reverse viewpoint from above photo);

The logs, stumps, table, stepping stones, composter and main garden have not changed this year. The benches have been removed from the swing area, a new herb garden space was added and the mulch was replaced with turf tiles. Though part of the ‘master plan’ this project was actually completed on a weekend in the Spring prior to my vacation.

The first of the three backyard projects during my vacation was the loose parts storage wall between the gravel digging area and the new, larger building area with recycled rubber surfacing (and a carpet in case it gets too hot to sit on – though it is fully shaded). I kept the water area adjacent to the building area because the children LOVE building bridges.

There is so much more space for storing loose parts/building supplies and it is easier to access than the previous deep bins. I used pallets for the wall so more recycled wood!

Bigger items are still stored in some of the bins.

The other side of the pallet wall has new storage for the digging area which never used to have any loose parts or storage, just a few pails, pots and digging tools. Now there are so many more options.

Backyard project two was to replace the tipi – I know, everyone loved the tipi but its shape and placement were not very functional. I used the poles and covering to form a roof over the entire corner of the yard. It makes a larger ‘house’ and the tunnel was moved here too.

This is the view of the yard from inside the house;

The third backyard project is the new messy play area. Located inside the garden wall it is separate from the other areas. Made from reclaimed wood, tile samples, and a salvaged laundry sink, the total cost for this project was $0. We have not used it yet (only been one day), I don’t think any of the children even noticed it as they were so excited to explore all the other new spaces. Besides, I’m still collecting some containers of ‘ingredients’ for the children to use here but…soon…

Garden Produce

Yes, yet another post that I’ve been slow to write – there is snow on the ground and I’m writing about the garden… Well, actually, I’m writing about stuff leftover from the garden. I just used our last tomato so we have no more ‘food’ from our garden but our garden provides some wonderful loose parts that we will continue to use.

This year our sunflowers grew very well – I wrote about them already. We didn’t just get seeds and flowers though, we also got to use the big sunflower stalks in our construction area;

Sunflower stalks are very light for their size so the toddlers feel super strong carrying them about. They make good bridges and paths;

Other popular loose parts we get from the garden are the beans. We usually grow several different varieties of beans. Some of course are grown to eat but the scarlet runner beans we grow for fun. This year there were some pretty impressive beans;

Taking the seeds from the pods is a very popular activity – partly because many of the toddlers love disassembling stuff (disconnecting schema) but it is also great for developing fine motor skills.

We were surprised to discover that the biggest pods did NOT contain the biggest seeds. The variety of seed colours and sizes is also very interesting.

These ones we brought inside to add to our seed collection to plant in the spring. We have many more out in the yard – they get used as ‘ingredients’ for potions, sorting by size and shape, transporting in pails and trucks, land art, and so much more. Sometimes we even discover bean plants growing in random spots outside of the garden. Wonder how that happened? 🙂

Sunflowers & Squirrels

Squash, peas, beans and sunflower seeds are large enough that the toddlers can plant them independently so we plan to grow them in our garden every year. We always grow a little bit of wheat so we can grind it into flour and bake something with it. Tomatoes are a staple in our garden too but we usually purchase seedlings to ensure we get plenty of tomatoes. Each year we also try some different things for variety – this year it was dill, radicchio, and carrots.

The weather was crazy this summer – most of our plants did OK but not great. All four types of squash failed to produce any usable fruit. The wheat and radicchio started off nicely and then fizzled and died – first time we’ve ever had a complete wheat crop failure. We had a fair number of tomatoes and a few beans and carrots but would have liked more. The sunflowers grew very well – almost taking over the whole garden.

We had planted two different types of sunflower seeds but there seemed to be more than two varieties of sunflowers – many different sizes and colours, some stalks with just a single flower, others with multiple flowers, some with few seeds and others that were mostly seeds. These fancy ones were my favourites;

The sunflowers created a lot of interest in the garden. Butterflies and bees were plentiful all summer long.

Squirrels were also frequent visitors in our garden – and they were not overly concerned about sharing the yard with toddlers.

The cats were entranced – probably wished they were allowed outside too instead of just watching through the window.

The squirrels were very messy – leaving piles of discarded shells and debris all over the yard.

They also left our sunflowers looking like this;

Luckily we still managed to collect some seeds to plant next year – and we discovered that the seeds from those fancy sunflowers turn your fingers bright purple!

Even without seeds the sunflowers made wonderful loose parts for outdoor play. The biggest one was a whopping sixteen inches wide!

Both squirrels and sunflowers were welcome attractions in our yard this summer.

Summer 2017

Fall is definitely on its way – today is cool, wet, and dreary.  It has been a wonderful summer.  There were many things I meant to write about but never did – probably because I was playing outside.  Today I’m huddled in front of my computer, cat sleeping on my lap, waiting for one load of laundry to finish so I can start another.  Seems like the perfect time to write a quick summer recap.

In the yard we built a new composter and fire pit and added a gazing ball (lovely good-bye gift).

17-09-sum01

We had some old pieces of cribbing that I let the children paint;

17-09-sum03

They now arrange the pieces in various configurations for follow the leader games and other gross motor activities;

17-09-sum04

Sometimes they make teeter totters but so far I haven’t managed to get a picture of them doing that.  They often make benches too – even though we have eight ‘real’ benches in the yard they seem to like theirs better;

17-09-sum05

We went on a long (9 km) hike to the Forks and back.

17-09-sum06

Watching the boats, ducks, and geese was great but couldn’t beat this;

17-09-sum07

Standing on the path under the train bridge watching/listening to the train above;

17-09-sum08

That was pretty amazing.

With colder weather approaching I’ve turned my focus toward our somewhat neglected indoor play space.  Plans have been made and work will begin soon.  By Thanksgiving we should have a new – tiny house inspired – loft.  So excited!

Spring Roundup

Spring is such a busy time for me.  As usual I’ve been collecting pictures to use in blog posts but not leaving myself enough time to actually write posts 😦

So, here is a roundup of what should have been three posts;

I made a batch of homemade glue for an art project but then realized the recipe made much more than we needed and it doesn’t keep for very long. So, I dumped it in a big bin along with paper bits from the shredder, wool scraps, glitter and paint powder.  The children enjoyed mashing it all together – no pictures of that part because it was way too messy to have a camera nearby.

Initially the mixture was extremely sticky and some of us were not impressed by the sensation of having our hands coated in the goo.  Eventually the paper absorbed enough of the glue and made the mixture easier to handle.

Later each of the children took a portion of the mixture to work with;

17-04-RU01

Or form into mini balls and throw around the room;

17-04-RU02

They pressed the mixture into the shape of the bowl and then we let it dry;

17-04-RU03

It took a lot longer than anticipated – nearly a week before they were dry and ready to take home;

17-04-RU04

Outside, now that the snow is gone, the boys have been begging for me to open the ‘summer toys’ bin. So far I have resisted – knowing there will be a big issue over who gets the one Batman figure (which may mysteriously disappear).  They’ve managed to keep themselves busy with the loose parts and eggs;

17-04-RU05

17-04-RU06

17-04-RU07

The longer periods of outdoor time have meant some are very tired by nap time (or earlier).  One however, has been using quiet time to become a jigsaw puzzle expert. He has now completed ALL of my 100 piece puzzles several times and can finish two of them in one afternoon.

I decided maybe we should try something a little more challenging – so I brought out a 500 piece puzzle.  This part took him two days with no assistance from me;

17-04-RU08

He did find the trees and mountains a little more difficult so I assisted with sorting some of the pieces. He is persistent and refuses to give up without finishing.  By the third week – after about 12 hours of actual work – he had done this much;

17-04-RU09

I think that is very impressive for a four year old 🙂  I’m not the only one who has been busy.


Glue

I both love and detest glue.  I love its potential as a tool for crafts – to adhere two or more items together.  However, there is a long list of annoying things about glue.

Sometimes it is too wet – damaging the paper or taking too long to dry so the children get frustrated and often give up before they successfully complete their project.  Glue is easily spilled and difficult to get it from the container to the spot you want it to be.

Sometimes it is too dry – clogged squeeze bottles, shriveled up glue sticks, glue pots containing rubberized mounds of  old glue.  I find it nearly impossible to have good glue available for the children to use independently whenever they want it.  At least 75% of all the glue I buy gets wasted – thrown out without ever getting used for crafts.

Cleaning up glue is another frustrating task.  Using water just thins it out spreading it further and further until the entire table is coated.  A dry paper towel sticks to the glue on a table more permanently than any of the craft supplies we tried to attach.  Clean-up is more time consuming than set-up and creation combined.

In an effort to find a solution to my issues with purchased glue I’ve tried several homemade glue/paste recipes.  Most have failed to provide good results – often easy to work with but the crafts simply fall apart after the glue dries.  However, recently I tried this recipe;

• 1 1/2 Cups Water
• 2 Tablespoons Light Corn Syrup
• 1 Teaspoon White Vinegar
• 1/2 Cup Cornstarch

Pour 3/4 cup of the water into a medium sized pot along with the corn syrup and vinegar. Bring this mixture to a full boil, stirring often.
While you are waiting for that mixture to boil, mix the remaining cold water and the cornstarch together. Beat well to remove all of the lumps. Slowly stir the water and cornstarch into your boiling mixture, stirring constantly. Bring this mixture to a boil and let it boil for 1 minute. Remove the pot from the heat and let cool.
Once cooled, put the glue in a covered container and wait at least a day before using.

The resulting jelly-like product was easy for even the youngest artists to scoop and spread;

16-02-glue01

Everyone was impressed by how easy this glue was to work with;

16-02-glue02

It is so sticky that layers upon layers of papers were quickly adhered together;

16-02-glue03

Even when only part of the paper touched the glue gravity wasn’t strong enough to release it after it dried – and it dried quickly too;

16-02-glue04

Stored  in a covered container, the homemade glue was still sticky and spreadable the following week but I wasn’t certain how long it would remain ‘good’ so I decided to use all the remainder in our sensory bin.  I gathered a bunch of other leftovers – shredded paper, sand, powdered paint, potpourri, etc.  The toddlers were curious and examined the dry ‘ingredients’.

16-02-glue05

I envisioned that once the glue was added we would be able to use the mixture much like clay and form it into shapes.  However, the children were hesitant to touch it now.

16-02-glue06

It was so very sticky that mounds of shredded paper was instantly stuck to the hand of anyone who dared to touch the glue.  It was an extreme sensory activity.  One by one the children began to mix the items together in the bin – very hesitantly – mostly just trying to bury the glue.

16-02-glue07

It wasn’t until I added a bit of water that the children became less reluctant to participate.  Even then they didn’t really seem to like the incredible stickiness.  They were however fascinated by the potpourri – picking out the bigger pieces and peeling apart the layers.

16-02-glue08

Not what I was expecting but very interesting to watch.  Still, the best was yet to come.  This glue, as sticky as it seems, cleans up in seconds.  I was so very impressed.  A quick rinse under running water and it is completely gone!  No sticky hands. No messy containers. No residue on the table.  Nothing.

Easy to make.  Easy to use. Easy to clean up.  Wow!

A Compilation

Every once in a while I find I have collected a few photos from activities that don’t become a blog post on their own but I’d still like to share them.  These are a few from the past month;

This was the result of nearly an hour of independent play after we got past the ‘There’s nobody else here to play with me’ stage;

16-02-misc01

Here is a picture of a cooperative game these two enjoyed;

16-02-misc02

I thought this was a pretty amazing tower built by a three-year-old;


16-02-misc03.JPG

And this two-year-old sorted these blocks like this several times, every day for more than a week!

16-02-misc04

Finally, this was something I made to use some extra acorn squash.  It was definitely not my favourite squash dish but it had the preschoolers clamoring for more.

16-02-misc05

  • 3 cups acorn squash, cubed
  • 1/2 cup applesauce
  • 1/2 cup raisins
  • 1/4 cup honey
  • 1 Tbsp margarine, melted
  • 2 tsp lemon juice
  • 1/4 tsp cinnamon

Mix all ingredients together and place in a greased baking dish. Bake, covered, in preheated 375 F (190 C) oven for 30 minutes; uncover and bake for another 20 minutes or until squash is tender.


The Christmas Bin

I have a couple of big bins that I call sensory bins.  Mostly we just use them for mixing stuff for messy play.  Recently I added a bunch of Christmas items to the biggest bin.

15-12-bin01

There are so many decorations that have wonderful sensory qualities but wouldn’t be acceptable to have as loose parts in the playroom with infants & toddlers (and cats).  Putting them in a sensory bin gives the opportunity for exploring these materials in a safe, contained, easy to supervise manner.

I included some of our tubes which were used as funnels for dropping other items through.  The bead chains were a challenge because if you let go before you got them in past the half way point the weight of the chain pulled the whole thing out.  It was frustrating but with a little trial and error and a lot of persistence there was success.

15-12-bin02

Many of the children enjoyed wrapping and tying the long strands.

15-12-bin04

Decorating the tubes was very popular – sometimes you couldn’t even see the tube after it was decorated.

15-12-bin03

I was going to add scented items to the bin but it still smells like the sweet grass we had stored in it last year – Mmmm.  I did add some bells, they don’t make much noise if you hold them but sound great as you dig through the bin.

So many colours, shapes, and textures to explore. These star shaped springs were fascinating.

15-12-bin05

The older children enjoyed collecting and sorting all the tiny, little rubber shapes (erasers – hundreds of them).  It was like a tactile seek & find.

15-12-bin06

We are all really enjoying this bin.